Tuesday, July 7, 2009
My Happy 3rd of July
Taking the train was also not in the cards - my shopping list consisted of a number of fairly heavy and bulky items - a brass deadblow hammer, an annealing pan filled with pumice, a small crockpot for pickle, and other assorted tools. The thought of schelpping back from 46th and 5th Avenue with those items, through Penn Station and a possibly crowded train filled with semi-drunk holiday-minded workers was enough to make me consider mail order.*
As much as I was looking forward to shopping there, I was also a bit leery. My friend Valerie of http://www.barneybeads.com/ had a truly awful experience there a few weeks before, involving the extremely uptight and quite nasty store owner and a box of dropped metal beads. Marie from http://www.eastofoz.com/ also reported a less than satisfactory experience with the store's climate control system. Armed with the knowledge that they staff at the store is not known for their friendly and helpful attitude (check out the yelp.com reviews), I had made up a shopping list the night before, took out my backback (they want you to leave your purse unguarded at the front of the store) and set my alarm for 8 am.
Friday morning dawned clear and bright - a mild breeze and low humidity would make for a perfect day to be in Manhattan. I was on the road by 10:30 am, and through the Midtown Tunnel by 11:00 - unheard of on a weekday morning! My preference was to park on 46th Street, but I was not expecting to find a spot on the street between 6th and 7th - but I had to try. I was surprised to find MANY open spaces on the street, and after contemplating the extremely confusing parking signs, I pulled into a spot near the corner of 6th Avenue, between two private vehicles with NJ plates that disregarded the admonition that the area was reserved for commercial vehicles only between 6 am and 7 pm .
I put $5.50 in quarters into the Muni-Meter, stuck the receipt on my dashboard, set an alarm on the iPhone for the time that the meter expired, and merrily and warily made my way to Metalliferous.
Where I was very pleasantly surprised.
The A/C was cranked up to full blast, and although there were a lot of customers in the store, it was comfortable to shop in. I had a slight moment of aggravation when I found I left my carefully prepared list at home, but since I had been thinking about this shopping trip for several months, I knew exactly what I needed to buy - the list was more for those catalog items that would have been nice to have.
I was disappointed to see that there were no deadblow mallets out, and when I asked for a brass hammer, the salesclerk showed me a tiny little watchmakers' mallet. I nearly burst out laughing, but we got that settled quickly when she pulled out the catalog and I showed her just what I wanted. I also picked up a 7" annealing pan, the mini Crock Pot for pickling, an assortment of sanding sticks, tinner shears, soldering pick, Solderite 6x6 board, a block of charcoal, and a metal scribe.
I also asked about the "Junior Polishing Set," and this is where certain members of the Metalliferous staff really shined. The female salesperson first thought I was asking about a set of polishing burs for the flex shaft, but I showed her what I wanted from the catelog. She didn't know if the kit - a 1/16th HP two spindle variable speed buffer was in stock, so she asked one of the guys - a Russian I'll call Yuri (probably NOT his name). Yuri told me that the kit in the catalog was "no good" but he had a better one, for less money. When he showed it to me, I saw that it was the same one that Linda had brought to class last week (the polymer clay session), which was fairly low powered, but I thought would be ok. I pointed out that I really needed tapered spindles for both sides (it came with a fixed-size chuck for the left hand spindle). Yuri said, rather good naturedly, that that could be a problem, but he'd see what he could do. He checked the Foredom catalog, found the correctly sized l/h spindle and said if I wanted the chuck, it would be $7.95 extra (he swapped it out for the tapered spindle). Now that the tool shopping was out of the way, I wanted to explore the metals.
I had gone through the stampings the last trip, so I concentrated on the oddities in the very back, and picked up some interested "faceted" brass flatback "buttons" in various sizes (they are more like very large sew-ons), a few strips of textured brass, some 6x6 copper sheet in 20 and 24 gauge, a package of bezel wire, 6 inches of patterned gallery wire, a small strip of 22 gauge fine silver, plus easy, medium and hard solder, a small bottle of flux, some flux brushes, a set of needle files (which HAVE to be better than the crap set I bought at Micro Center), a full size flat and a full size oval file, and a couple of leather finger cots. Gathering everything at the front counter, Mr. Full of Himself (the one who gave Val such a hard time) told me I was making a mistake buying the low powered buffer. We talked a bit back and forth, and I actually thought he was right - at the end of the day, I'd seriously regret the purchase. So, I ended up treating myself to a hammer handpiece for the flexible shaft machine**, a chasing hammer and a texturing hammer (this last item I don't know if I'll really ever use).
Checking out was a real pleasure - the salewoman who helped me was a doll - young, but really talented - and a Star Trek freak. She remembered that one of the Dabo Girls from ST:DS9 had the same first name as me. We talked a bit about holiday plans - she's heading home to San Francisco for the week that the store is closed. I left, feeling very satisfied - and about $500 poorer.
I walked back to my car, which reminds me - funny story about parking. When I was getting ready to check out, the alarm on my iPhone started to ring.*** I commented that I probably should run back to my car and put more money on the Muni-Meter, and four people promptly told me I didn't have to bother - it was a holiday and all meter requirements and parking rules were suspended.
Anyway - when back to my car and was going to go bead shopping at the two stores Val told me about on 47th Street.
So I walked around the block, only to find that 95% of the store fronts were empty, and some had signs "Closed for Jewelers' Holiday - 7/1 - 7/13". A guy comes out of one of the buildings, and sees me looking. He asks what am I looking for, and I say there's an arcade with a bead store - he tells me that they are closed until mid-July - like everyone else.
Oh, well, it's not like I really need to buy more beads. I walk down 47th Street, some of the windows still had jewelry on display - I admired one store with some pretty spectacularly large mine cut diamond earrings. There's a vendor on the corner selling "Pashmina" for $5 a piece - I bought four. So the walk shouldn't be a total loss.
I though I'd also stop in at Allcraft - which was located (according to my iPhone) at 45 W. 46th Street. No, it wasn't. I think it's on 29th Street now. So, I bought a bottle of cold water, went back to my car and headed home, a happy shopper.
_______________________________________
*I hate doing mail order for tools. It costs a fortune to ship, even though the store is probably using a flat rate Priority Mail parcel.
**I just love saying/writing "flexible shaft machine" - especially to people not in the jewelry trade.
***If you're keeping score, the alarm was "Coultergeist".
Thursday, May 7, 2009
Silver on Silver - Oddly Victorian

Materials
Hill Tribe Silver Beads - Cast 15mm bicone - Thailand
Hill Tribe Silver Beads - Woven metal ribbon 8mm bicone - Thailand
Sterling Silver Donut 4mm Spacers - US
Sterling Silver 2mm seamless rounds - US
Dark Silver 10mm ovoid fresh water pearls - China
Light Silver 5mm keishi pearls - China
Bali Silver "S" Clasp
Stringing Material - Light Silver Gudebrode Silk - "E" weight
Tools
#10 wire beading needle (2)
Silver "french wire" fine (.5 inch)
Tri-cord knotting tool
A co-worker commissioned a necklace from me. She wanted chunky and silver and long. Since she wasn't prepared to spend several hundred dollars for 48 inches of Hill Tribe Silver, I suggested gray pearls and a little bit of silver as accents. From the selection I showed her, she homed in on the light gray/silver palette - particularly the small keishi pearls and some larger 12mm ovoids. From my silver box, she selected probably the heaviest silver beads I had, but I was able to steer her to some lighter, less expensive accents as well.
The result is oddly Victorian, which really wasn't my goal, nor is it particularly my style, but I am really pleased with the results. I don't normally work with a monochrome palette - contract is king in my book. But I really like it, and will make a variation of it for myself sometime soon.
Materials Cost: $50.00
Time to Complete: 2 hours
Difficulty: 2 out of 5
Bone and Amethyst - A Match Made in Hell

Early on in my beady-beading career, my mother (and best client) asked for a necklace of ivory and amethyst. A lovely combination to be sure, but real ivory beads cannot be sold except as an antiquity. I convinced my mother that I could find substitutes that would be just as good - and I did. Way back, some time around 1992, I found 16mm round polished bone beads. They were from Germany and I paid a pretty penny for them (probably close to $100 for two strands). I paired them with 10mm round AAA quality amethyst and 14k spacers. The whole thing was struck on silk and was one of my mother's favorite necklaces.
Friday, May 1, 2009
Pearl Torsade - It's Alive, I Tell You - It's ALIVE!
Well, not really - but I've been feeling a bit like Victor Frankenstein, obsessed with my own creation.
The materials include 8 strands of teardrop pearls, about 75 Tanzanite AB2X 5301 - 4mm, 5 vintage amethyst Swarovski crystals, 150 brass spacers, 2.5 tubes of size 10 Delica Light Amethyst and a few size 11 Delicas in the same color. And nearly a full spool of Fireline.
Here is a closeup of the center embellishment
Figuring out the closure was a nightmare. When I ended the piece with the peyote stitch caps and the little "ruffle" of size 15 Miyukis, I was planning on using a magnetic closure so the two ends would "kiss" closed. Didn't work - the necklace was too heavy for the magnets. Then I created a toggle set from matching Delicas:
Ugly isn't the word. Two additional attempt were even worse. But last night, I had a brainstorm - and this is how I finished it:
Material Cost: $250 (approx)
Time to Complete: 100 hours
Difficulty: 5 our of 5
Tuesday, April 14, 2009
What I've Been Doing Lately...
All I can say is that I've completed all of my resolutions, with resounding success. Thanks to my friendly neighborhood Local Bead Store (LBS). Well, actually not so friendly - some of the staff are, shall we say, not quite Nordstrom-ready if you know what I mean. Beads n' Stitches, in Hickville is a really incredible place - not for the beads (although the selection is pretty nice), but for the classes. Since January, I've taken a class just about every other week, starting with Peyote Stitch bezel (which is what induced me to start doing this), diagonal peyote (not my favorite), and toggles and bails with a Russian Spiral, which was nothing that I couldn't have taught myself.
So, just as I've gotten pretty addicited to the little seed and cylinder beads, I signed up for the basic fused glass class. taught by Jane Cummins. That one was loads of fun, and I made some really pretty stuff. I was thinking about signing up for the classes at the Long Island Art League in Huntington, but glass isn't where my heart it. It's with the metal.
Two weeks after the glass class, I got my first taste of PMC in the first of a series of classes with the amazing Linda Twohill.
Oh boy, am I hooked! Well, I wasn't really hooked from the first class, which was ring making. The skills we learned were pretty advanced for first-time PMC users, and I was not 100% sold on the material when we got done, but it has really, really grown on me.
In this first class, we had the choice of making two out of three ring styles. Everyone did a PMC on sterling band (mine came out pretty junky, and I wasn't to heartbroken when I broke it), and then there was the choice of making a wrapped wire and PMC slip ring (cool but not me), or a slab/wrap ring. I think I was really attracted to this style because of the design possibilities. And what do you think happened? I got too ambitous, and killed my clay (overworked it and it dried out too much). I needed to buy a second package (not a big deal, I was able to resurrect the other clay for the next session), and I was thrilled with how the finished product came out. I wear this ring two or three days a week. It's not flawless by any stretch - I was a little uneven in the pressure when stamping the pattern, and the ruffles don't quite line up. It's also a bit big for the ring finger, and a big snug for the middle one on a warm day, but it works for me. I'm actually still "refining" it - the edges are a bit rough (someone hogged the greenware files in class, and so didn't smooth them before firing). It also had a strange encounter with some eggs, and a large part of the band turned black. I've buffed it up, but it should be repatinated.
Two weeks later, Val and I took the "focal bead" class - and that was a ball. I had most of a 16 gm packet of PMC from the rings class two weeks earlier, so I made two pendants. The first one, with the ruffled edges is good, but not perfect, but the second piece is pretty close to excellent.
Before the end of that day, I signed up for the Intermediate Techniques class, and PMC studio session - no new techniques, just PMC and all of Linda's tools and toys to play with. (I also enrolled in her metalworking class, more about that in a later post).
The Intermediate Techniques was fantastic - we learned box making and stone setting, how to use stencils, PMC syringe and PMC paper, and lots of other really neat stuff. I still had some PMC left over from the Focal Bead session (and Val gave me her leftovers), so I was able to create two really substantial pendants.
The zodiac piece is my favorite, and I wear it all the time - but it's pretty wonky. The top ring is really uneven and the backside is a bit twisted - but the effect is cool, and I love how it feels around my neck.
I also like the flat box piece - it's two pendants in one. The nautilus on one side, and the Victorian flourish on the other. It also "sings" a bit - the chain makes a slight noise against the silver walls.
Next Saturday is the PMC Studio Time session, and I've been dreaming of the piece I want to make. I don't know if I've got the skills to execute my vision, but I am going to try. It's a set of braclet links. The large center piece has a Celtic dragon embossed on the top, with a frame around the dragon, the back embossed with a swirl pattern. I also want a subtle pattern on the frame, too. The corners will have triangular holes, and I want to set a few orange opal cabachons. The side pieces will feature the same frame and embossed pattern, but I'll add dragonflies from PMC paper instead of full-sized dragons. I haven't worked out the clasp yet. I may just bring in a Saki clasp as a template. It's very, very ambitious.
Tuesday, April 7, 2009
Success At Last

I have been having a lot of trouble with this. The beads are thick, about 4 mm, the sides slope slightly, there's a bulge for the hole, and no matter what I do, I can't seem to size the bezel properly. I've tried to do make the bezel about five time now, and no, I don't want to back this with Lacey's, or ultrasuede - it needs the light. Blocking off the back makes the colors very muted. Not ugly, mind you - just not as brilliant as I wanted them.
This is what the individual bead looks like:
Why do I want to bezel a bead that is thick and so awkwardly shaped? Because it would be magnificent in a bezel of glossy black delicas. I am planning on suspending all nineteen from a herringbone rope, with peyote columns capped with Swarovski bicones. It will be fantastic, if I can only get the damn thing bezeled.
Well, it took three more evenings of work for this try, but I finally managed to bezel that darn dichroic bead. I only needed 7 or 8 attempts, three different beading books, a download or two from Beading Daily, and finally, my own ingenuity and patience.
I present to you, the bezeled dichroic bead, in all its glory (unbezeled, then bezeled, show the front and back):

For the next eighteen, I will probably not need the two bridges of delicas across the back, but I'll probably take a week or so before starting the next one. I've had a splitting headache since Friday, and there's nothing worse that beading with black beads.
Fakes and Frauds on eBay
The seller does have some nice looking beads, and the prices are good, but...I'd be wary of a lot of the products listed.
The seller has purple, red, cherry and volcano and other colored "quartz" and does not state that these are man-made materials, and are bascially a forumula of glass. Also, the colored turquoise - "maple," "pumpkin", "fire", and others is listed as "stabilized" but not that its been dyed - turquoise does not come in orange, purple, or red. I'm almost positive that it's not even turquoise but magnasite.
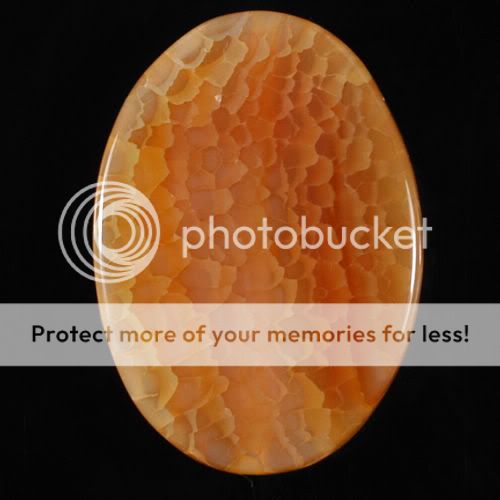
But my biggest problem is the "crab" and "fire" agate. In almost every listing, the material has been dyed and "enhanced". There is a form of agate called "crab" or "crab fire" which is mottled red, orange, and white, and looks somewhat like the back of a cooked crab. It should not be mistake for "fire agate" which is a much rarer type of agate that occurs in nodular form, has similar optical properties to Australian opal.
Crab agate is a pricey material when cut well, but over the last few years, cheaper look-a-likes have come on the market. In the latter case, the manufacturer (probably Chinese) has taken a common form of agate, cut it, drilled it, dyed it, heated it, and plunged it into a cold bath to induce fractures.
This one's the closest to looking like the real thing (but it's not):
This one's pretty scary - it's banded agate that's been dyed green (a pretty common material), heated and cooled to induce fractures, then dyed with white to highlight the fractures, and finally dipped in an acid bath to give it a matte finish.
THIS is what real crab agate looks like:

This one is not:

(These are not examples from the eBeads seller on eBay, but from pictures posted online).
Can you see the difference? In the real one, the mottling is on a single plane - but in the second image, there is a definite layering, like a bird's feathers. Also, in the first one, the mottling is soft, rounded and fit together like plant or skin cells- extending out in all directions. In the second one, the mottling is distinctly directional and very uneven, very much like a broken car window.
I don't think the eBay seller is deliberately trying to mislead, I just think that s/he really doesn't know much about what s/he's purchased and is simply relying on the descriptions from the wholesaler. Just because 50 sellers on eBay believe that "dragon skin" agate (the same process as "crab fire" agate, but with black dye) is a naturally occuring mineral doesn't mean that it is. There's nothing wrong with buying and using these types of beads, but ignorance is not bliss, and you shouldn't pay for something that's essentially a fraud.
I get so aggravated by these frauds. I have too many friends who now have trouble making a living trying to sell the real thing at $20 a strand when the booth across the aisle sells these fakes for $5.