Thursday, February 25, 2010

Kumihimo Journeys - Part II

NB:  I had not intended to take nearly 4 months to write more about my Kumihimo efforts, but between the holidays, my continuing obligations for The Noritake News, a herniated disc in my cervical spine, and a trip to Tucson (yah!), I completely forgot that I had started to post about my Kumihimo work.  In fact, this post was originally meant to be a cross-posting of a series of pieces I wrote for the Beading Daily forums, mostly in response to a recent Beading Daily blog entry by Leslie Rogalski, who wrote about using wire and pearls for Kumihimo.  The initial post in November was written from the perspective of learning a new craft and exploring possibilities.  The following (and subsequent posts are more about conveying what I've already learned).

ooOoo

I'm not an expert on Kumihimo, by any stretch of the imagination. I don't use a traditional marudai and tama, and I don't think I even want to, and if you want to really learn about the art and science of braiding, I definitely recommend reading Jacqui Carey's or Roderick Owen's books on Kumihimo and other braiding techniques. I've simply taken one class with a very good teacher, read and practiced and then extrapolated on the single technique of braiding with a foam disc, plastic bobbins and beads. In my daytime/non-beading life, I put a lot of effort into capturing "lessons learned" and publishing institutional knowledge for my company - and it seems to always carry over - I just like to educate, I guess.

The Tools:

The traditional Japanese craft calls for a wooden marudai and weighted tama (bobbins) - and you work with both hands moving opposite strands in a variety of motions to obtain specific patterns. It's very difficult to work with beads using the traditional tools. Actually, its simply difficult to work with the traditional tools, period - with or without beads. The smooth wood and the need for weighted bobbins and counterweights on the growing braid are simply not conducive to moving beads.

The Loom (Or Disc): The invention of the foam disc with 32 slots made working beads into braids extremely easy, since the foam slots hold the working strands in place, eliminating the need for weighted bobbins. There are two major manufacturers for the standard round 32-slot kumihimo disc - Hamanaka and BeadSmith.

When you start with the basic "fill the slot" kumihimo braid (the best one for an all-bead braid), you need to orient the 8 strands equally, and this usually works best with cardinal compass points (NESW). Both the Hamanaka and BeadSmith versions have the cardinal points marked, but for some odd reason, the Hakamata disc offsets the points by a few degrees - so when you hold the disc and the logo is parallel to the floor, the strands form an X, rather than a cross, but since you need to orient the strands to a cross (cardinal compass points), this becomes awkward. The Beadsmith disc has the markings correctly oriented and aligned with the logo, so you start out properly. I did not know it at the time, but the person who taught me how to make beaded braids - Anne Dilker of Mosshollow Pottery - was working with BeadSmith on the new disc.

Making your Own Disc. This can be done with 1/3" thick foam rubber - though you can definitely use foam core or cardboard (both of those will break down quickly, though). I've found the perfect round disc in the Children's craft section of Michaels' - it's sold as a "memo" or "pin" board, and you'll have to pull off the hanger from the back, but it the only piece of thick foam that I've found readily available. The foam stuff in the craft stores is very thin and you'll otherwise need to glue several layers together - which can be messy unless you can find the packages of pre-adhesive circles.

When you cut your slots, try to keep the cuts short (no more than 1/3 of an inch, and it does help to cut a little of the foam away from either side (look at a premade disc to see what I mean), This will help getting your strands in and out of the slots, and keep finer materials from fraying.

Bobbins: Bobbins are essential - in both large and small sizes. Even when making short braids, having your thread tails properly wrapped up helps ensure even tension. These are not sewing machine bobbins, but ones that are used by knitters. The best type are the disc shaped ones, called EZ-Bobs, which have flexible covers that pop opened with a little thumb pressure. You can get a set of 8-12 small bobbins for about $4 on eBay, or $8 for the larger ones. While you make only work with 8 strands at a time, it's always a good idea to have an extra bobbin or two around. The small sizes are good, particularly for short strands and when you are braiding with thin cording, and the larger for heavy cord, long strands or bigger beads.

Counterweights: My teacher didn't think that counterweights were necessary when using the foam disc, but I disagree, I like to use a counterweight on the braid, particularly when starting out with lighter weight strands or a combination or light and heavy weight strands. My counterweight is a drawstring bag filled with pennies - and I can adjust as needed. When using a traditional marudai and tama, the corrolation between the weight of the bobbins and counterweight on the braid need to be pretty exact.  Using a counterweight on a foam board is just a matter of determining what feels best and keeps the tension even on the growing braid.

There have also been times when I've needed to counterweight the bobbins instead of the braid. After a few uses, particularly with heavy material strands (such as satin cord), the slots stretch. If you then go back to using thinner material strands, it becomes hard to keep even tension when the braid becomes heavier than the collective weight of the bobbins. For example, when I was working on a braid with eight strands of seed beads, I needed to keep a counterweight on both the braid and on each of the bobbins (which were, individually, quite light). For the bobbins, I used brass drops I found at Metalliferous. They had holes in them, so I used either safety pins or paperclips to attach to the far end of each of the braid strands.

Stringing Materials - Non-Bead Strands

Satin Rattail - This is a smooth, shiny woven cord, soft and flexible - but also quite durable and not prone to fraying along the body. It is pretty much the most popular material for non-beaded braids. There are three sizes and two kinds of rattail. The sizes are referred to as Rattail (largest - 2 mm, and most popular weight), Mousetail (medium - 1.5 mm) and Bugtail (thinnest - 1.4 mm), and are either made from Rayon (wood-based fiber, US made. Expensive and can hard to find) or Polyester (petroleum-based fiber, Chinese made, very common and generally cheap). Both the rayon and polyester come in a wide variety of colors in the "rattail" size, and less variety in the other sizes.

Except as noted below, all of these braids were made with satin rattail. The large diameter braid (third from the top) is a twelve-strand monster.


Gimp - Shiny rayon or polyster thread coiled around a multistrand cotton base, equivalent in size to bugtail. Gimp can be found in spools or unwoven from upholstery trim. It's also a difficult material to use with a foam board, particularly a new one, since the coiled/wrapped covering doesn't hold up to the constant rubbing against the slots, and the bobbins, nor against pulling and retensioning. The green braid, fifth from the top has two strands of green gimp and the last braid in the arc (on the bottom, with the green beads) used six strand of gimp and two of Super-C for the beads.

Knitting Yarn - Great stuff, particularly novelty stuff like ribbon yarns, eyelash yarns, ombres, etc.  I strongly recommend checking out the closeout pages on WEBS, for single balls of really interesting yarn.   I've had my eye on yarn made from recycled sari silk, and I'll provide an update when I finally do try it out. The one thing to be careful about is matching weights when you're mixing fiber types. Lightweight yarn should be mated with something that has a bit of body and strenght (like S-Lon or SuperLon) when other strands in the braid are made from heavier materials. The narrow pink, purple and black braid (second from top) is make with Japanese knitting ribbon paired with matching colors of SuperLon.

Embroidery Floss - Great stuff too, and this is the traditional material for making "friendship" bracelets (a type of flat braid). An all-floss braid will be very small in diameter, but quite strong. An interesting treatment is to combine on or two separated threads of metallic floss with a strand of rattail into a single strand (one of eight).

String Materials - Bead Strands

SuperLon or S-Lon: Nymo's really heavyweight cousin was invented for the shoemaker trade - this is the same stuff that holds the uppers to the soles of your shoes. Althought this was the thread I was taught to use for beaded braids, I've found that it is a bit of overkill strenghtwise and can be hard to work with when using beads that have small holes, or when you really would like to use a big-eye or twisted wire needle when threading beads. The diameter of SuperLon is just too thick to pass through most beads when doubled. I do like to pair SuperLon with lightweight yarns on a single bobbin to give them strength and durability.

Nymo: I have not had a good experience with Nymo - I've found it to delicate to withstand the constant pulling and friction on the disc. However, your mileage may vary.

Beading Silk: I'm a big fan of Gudebrod spooled silk, for both stringing/knotting and for kumihimo. There is nothing like the slide of beads on silk, and the suppleness of the finished product. While there is a lot of length on a spool (in 20 years, I've only emptied ONE spool of silk), it is still expensive and a full range of colors can be hard to find.

Pearl Cotton Embroidery Thread: This is the best substitute I've found for silk, and I've got a line on a great supplier who sells the thread on bobbins in a very wide range of colors - Threadart. Frankly, I bought the thread and figured that it wasn't going to work - that it would fray from the slots and the pulling - but it's as durable as silk (maybe more so). While the cotton is not as frictionless as silk, it's still a pleasure to use.

Metal Wire: I do confess, I was left scratching my head after seeing and reading Leslie's post on Kumihimo last week when she used wire. No disrespect intended, but the results were less than pleasing to my eye. The wire looked kinked and the finished bracelet examples looked very stiff and uncomfortable to wear. The essence of kumihimo is the evenness of the braid - each strand fitting and interlocking, creating a seamless whole. Using wire for every strand (even "dead soft") defeats that. I can see where a thin wire, married with rattail, could result in a very pleasing, albeit stiff, braid, but I'm just not on board with eight strands of stiff wire. Sorry.

Coated and Cabled Beading Wire (Beadalon, Tigertail, Softflex): Not something I would recommend under regular circumstances (see the "Beads" section for irregular circumstances). This stuff is expensive, particularly the 49 strand material that has the best drape and flexibility! Why waste it in a braid?

Fireline and Other Braided Filiments: Useful for particular circumstances (see "Beads" section for further explanation).

A note about thread color.

When creating an "all bead" braid, the color of your thread will be of minimal importance, unless you are using transparent beads. The thread is fully buried inside of the braid, so you'll usually will never see it, but if your beads are large, or irregular, the thread may be visible within the work. If you're a perfectionist (like me), you'll probably want to match your thread to your bead color regardless.


When beads are on only a few strands of a braid, color will be more important, since you'll see the bead strand thread within the body of the braid.


END PART II- GO TO PART I - GO TO PART III


Thursday, January 7, 2010

365 Creative Challenge

I subscribe to quite a few jewelry and craft arts blogs (note to self - update the blog roll to the left), and a few have written about a recent challenge - to complete a piece a day for the entire year. This is a bit of a head-scratcher for me, looking at it from a jewelry arts perspective.


If I was a professional jeweler/artisan - then completing 365 items/one per day for a year may make some sense, but as a hobbyist? Is the point of a hobby to create as much as possible in the shortest amount of time reasonable, and is the jewelry actually being completed worthwhile and something to be proud of?

Some of the challenge participants are lampwork artists who are using their own glass beads as the principle elements of a work, others are making very simple earrings with premade earwires and single crystal beads. To me, this latter group is cheating - big time. While simple works such as these have their place (usually the $2.00 basket at a local crafts fair), how is this being creative? It seems to me that such "efforts" are done for the sake of achieving the challenge, not for advancing one's skills (unless closing a headpin is a skill that needs improving) or creating something to be proud of.

Okay - I may be making a huge pile of assumptions here - but looking at the works of some of the participants (the earring-makers) - these artisans are capable of so much better that bead on a wire dreck.

Perhaps my issue is not with "cheating" the challenge - i.e., creating something simple and mindless just for the sake of achieving the goal of one piece per day, but with the challenge itself. Artists and artisans, just like writers, go through both periods of great creativity and periods where nothing seems to go right, when works in progress just pile up, or pieces started and ripped apart. This is, to me at least, a part of the creative process, and it makes us better - whether in a spiritual sense (suffering improves the soul), or in a technical sense (working on the process hones your skills). A challenge that is essentially makes the challenge participant a factory production line is pointless.

Would not a better challenge for an artist or artisan be to learn a new skill a week for a whole year? A skill could be anything that improves your workflow, reduces your costs, or betters the completed product. For example, learning how to use flush cutters to create two flush ends on a jump ring - this may not seem like a big deal at first glance, but it's a skill that means you don't have to purchase pre-made jump rings.


I need to think about this some more...


Monday, January 4, 2010

Adventures in Cosmoline

If you buy tools that were made in any of the former Eastern Block countries or in India or Pakistan, you're probably familiar with the brown goo - the Devil's gunk - the big sticky - the crap known as:

Cosmoline

Wikipedia has this to say about the stuff:

"Cosmoline is the trade name for a generic class of rust preventatives, conforming to MIL-C-11796C Class 3, that are a brown colored wax-like mass; have a slight fluorescence; and have a petroleum-like odor and taste. Chemically, cosmoline is a homogeneous mixture of oily and waxy long-chain, non-polar hydrocarbons. It is always brown in color, and can differ in viscosity and shear strength. Cosmoline melts at 113-125 °F (45–52 °C) and has a flashpoint of 365 °F (185 °C).

Its most common use is in the storage and preservation of firearms. Previously, cosmoline was used to preserve other items. Objects the size of entire vehicles could be preserved for future use with cosmoline. During World War II, US Coast Artillerymen (serving the huge coastal artillery batteries) were known as "Cosmoliners" because they were tasked with the near constant cosmoline application ("greasing down") of the guns. During Pacific island campaigns in World War II, the United States Marines sang a song about cosmoline. Adapting the popular big-band tune "Tangerine," they would sing "Cosmoline...keeps my rifle clean."

Due to its gelatinous nature, cosmoline can be difficult to remove..."

An understatement to say the least.

***

Firearms aren't the only thing that come coated in Cosmoline - tools made from carbon steel from the aforementioned places East of Here come packed in it. It makes sense, since they are shipped via ocean freight, and salt and water are innimicable to non-stainless steel. It would be nice, though, if once they got to the US, they were cleaned up and repackaged so that one could actually use the tools without having to spend hours degreasing.

Getting Cosmoline off of steel bench tools is probably child's play compared to getting it out of a rifle or engine, where it's packed into every tiny crevice. A few months back, on the Beading Daily forum, I was bemoaning a lost opportunity to purchase a small rolling mill. I had passed on it because the gears were caked in the sticky goo, and I had no way to clean them. A member told me that he had great success using denatured alcohol instead of a commercial degreaser - which is extremely caustic. I tried it on a disgustingly sticky bench block, and was eminently satisfied. Denatured alcohol does need to be used with proper ventilation, but it's not caustic and won't destroy clothes or skin.

Anyway, last month I bought myself the PepeTools dapping block and punch set I really wanted - the one with the big 2" punch and the 2.5" block. For some reason, I thought that it would be all nice and clean and look like this:

But no, it wasn't. It was a bag of brown, stinking mess. Actually, it was a bag of brown stink in a box filled with packing crud. I tried to save myself a bit of effort by opening the box over a garbage can (a big 60 gallon can already three-quarters filled with packing material and other assorted detritus). That would have been a Good Thing, except that I picked up the bag from the wrong end and all 21 punches plus the block fell out of the bag into the garbage can, swiftly sinking amongst the upteenthousand pieces of polystyrene packing peanuts. I was able to get the big pieces easily, but the small punches were elusive. Shifting the garbage into an empty pail, I recovered 20 out of 21 punches, before I up-ended the last quarter of the garbage onto the floor to sweep through it by hand. Of course, I almost missed the last punch - it was the smallest one, with 3 or 4 peanuts sticking to it.

Ready to commence de-greasing, I reached for a small metal utility bucket - from the paint department at Home Depot - when I nicked the tip of my right middle finger on a strip-making tool for my metal clay work. Lesson learned - putting a sharp edged tool out of the way does not mean you've put it away safely. The blood from this cut ran down my hand, dripped over my arm and spattered all over my workbench (note to self, check hammers for blood spatter).

Since I hadn't even thought about shop safety (note to self - get a small First Aid kit for the bench), I ran back to my desk, fumbled for the spool of medical tape I keep handy, a paper towel and some latex gloves.

I also decided to see if regular rubbing alcohol would work on removing the Cosmoline coating. It actually did - for the punches, which were also wrapped in Cosmoline-coated paper. The block, however, was another story. The goo was too thick for the isopropol alcohol to work, so I switched containers and poured the denatured alcohol over it. Eventually, with a bit of elbow grease (pun clearly intented) the goo came off.

Of course, well after the fact, I went on-line and researched methods on Cosmoline removal. Most of the information comes from gun and militaria collectors who have a strong preference for commercial degreasers, but one site recommended using a steam cleaner, which makes perfect sense. While boiling hot water will melt away the gunk, I'm adverse to exposing easily rusting metal to water, and letting large hunks of steel soak in boiling water brings up a different problem altogether. Metal holds heat, and letting a pound or two soak long enough to remove the Cosmoline will mean that it will become too hot to handle easily, which means that if I let it sit in the hot water long enough to cool down, all of the grease will re-attach itself, leaving me back at square one. Using a steam cleaner means that while the steel is exposed to boiling water, the steam flashes hot, blows the goo off and the minute droplets dry quickly, minimizing the opportunity for rust.

Anyway - I've cleaned up all of the bench tools, gave them a light spray of WD-40, and now that my vacation's over, I'm left wondering when I'll actually have time to use them.

Pre-New Years Bead Celebration

Glass beads haven't been my "thing" for a few years now, so I haven't had much reason to go to 37th Street to buy beads, but since I started on the kumihimo, I've found a need for certain types of glass - drops and larger seed-type beads, and 37th Stree is really the best place for these. Not only are they cheaper, but the selection is head and shoulders above anything that I'd find in a retail store or on line, because I can buy in quantity.

Since it was a holiday week, I elected - despite the consternantion of MDF Val - to drive in. Thanks to the coupons at CentralParking.Com ($20 for 6 hours, including tax), it was actually cheaper for the two instead of taking the train. I parked on 38th, between Broadway and 7th, and it was a short walk to bead paradise.

Although the ever wonderful Crafts & Creations (a/k/a Amola, a/k/a Crafts and Cretins) has been gone for nearly half a decade, there are still treasure to be found - and in the old stores (the ones run by 3rd and 4th generation Jews) it's definitely like digging for buried treasure. There are a bunch of newer stores, run mostly by Chinese - legitimately wholesale outfits (as opposed to the dreck-filled retail outfits on 6th Avenue, close to Bryant Park, north of M&J), and while quality and price are reasonable, the shops are too clean, too bright, almost too homogeneous to be fun.

Val and I did spend some time in Stone International - mostly perusing the pearls. She was looking for really great silver/gray coin pearls, and found some good ones that didn't look "gloppy", while I bought mostly copper beads, some interesting carved quartz crystal, smallish pyrite coins, and of course, some pearls.

From there, we went into Margola. They were packing up for Tucson, so the place was even more of a wreak. V got a lot of bigger beads - interesting color Czech fire polish, while I concentrated on the seeds. I ended up buying some duplicates of beads I bought last October, when we made a flying visit after the Whole Bead Show (that will teach me to put beads away in the wrong places), but I also found 11 and 15 Czech charlottes in great iris colors. It seemed to take forever to check out (no pun intended), and when we finally walked out, it was close to 1pm and V was starving and my headache was back with a vengence.

We had lunch at a very expensive steakhouse ($7.50 for 2 glasses of fountain-dispensed club soda), and then it was on to York Beads.

I haven't been in York since before the turn of the last decade - I made a trip there just before my eBay selling days crashed and burned and I packed it all away for nearly 7 years. The store has changed quite a bit - it's nearly tripled in size (they took space from the first floor storage), a much greater emphasis on direct sales, and the basement's all cleaned up. But you still have to buy most stuff in quantity - quarter-masses and the like, but there's also bins of strands for $1-$3 on the floor. Although if you looked at the loot I brought home, there doesn't seem to be much in the way of self restraint - I actually did hold back. No round glass beads (although there were many luscious pink opal glass strands I could have bought), no flower beads, no leaf beads. Just drops and daggers and farfalle beads.

Now, I've got to get some projects going - especially the one commissioned - a kumi-rope of hematite, which I'll use the hematite-like glass drops to create a square rope.

And something in orange and perhaps some pink. Just to bring a little sunshine into the depths of winter.

New Business Cards

I'm off to Tucson at the end of the month, and MDF Marie of East of Oz reminded me that I need to bring business cards. It seems that some of the wholesale dealers don't like to sell in small quantities, but if I tell them that I'm working on a new line - and having business cards to prove that I'm a bona fide business - I shouldn't have problems.


I finally have found a use for the tres expensive Dover Pictura Vector collection of Art Nouveau images I bought last June - although I wasn't able to use the EPS files - my skills with Illustrator need a lot of work. I did find that the JPG files were really high quality, and I was able to get the same effects using Photoshop.

I had started out with a picture of recent works all massed together, and after taking nearly 100 pictures that looked like garbage, I decided to go in a completely different direction - and I must say - I like it. Although I am typically and Art Deco kind of girl, when it comes to graphic images - Art Nouveau/Arts & Crafts/Pre-Raphaelite Brotherhood can't be beat.

The back of the card, which isn't finished yet, will have the William Morris fruit tree background in gray, and all of my contact details. Then off to Vistaprint - which I find is still the best deal in town.

Friday, November 13, 2009

Kumihimo Journeys - Part I


A bit of background. Back in late March, early April, I took a class on how to make kumihimo braids and incorporate beads with Annie Dilker of Moss Hollow Pottery. (I was interested in Kumihimo because I thought it would be a good craft to travel with - not that I really knew anything about it, but I'd seem some pieces made for a class at Beads n Stitches, and I was intrigued.) The class was given during an Innovative Bead Expo show, which I had only gone to because my PMC class was cancelled. I had been thinking about learning the technique for a while - and when I heard a woman behind me on the line to get into the show ask about the class, I chimed in that I'd like to take it too. It turned out that there were no students signed up for it, but the teacher would be willing to give the class anyway.

I made this necklace - very typical "me":


Unlike other some teachers I'd taking beading classes from, Annie didn't bark at her students, she didn't act like she was the Queen of the May deigning to teach something. She didn't play favorites. Better yet, her instructions weren't full of errors, missing pages, steps or written backwards.* Simply put, Annie was a great teacher - patient and dynamic. She didn't info dump, rather she would have us pause our work and she'd relay some information. I walked away from the class excited and eager to learn more. When I got home that evening (the show was in Tarrytown), I spent hours on line trying to learn more about my new skill, and (equally important) where to find braiding materials. In class, we used satin rattail for the non-bead warps, and SuperLon for the bead warps, and while I bought a range of colors in the SuperLon from Annie, I figured I'd have no trouble getting the rattail. Turns out that finding rattail in quantity, cheap, isn't easy. The rayon cord is better than the polyester, but it more expensive and is much harder to find.

I also discovered Jacqui Carey's site, and learned about the traditional method and materials for kumihimo - the marudai (the loom and stand), tama (weighted bobbins), and the loose multistrand "ropes" made from silk or rayon (in my eyes, the braids made with these materials are much more interesting that the rattail braids). I ended up purchasing a whole range of colors of the polyester rattail from a seller on eBay (Dollites) , a bunch of larger ez-bobs from Primative Originals, the self-covering bobbins favored by the modern kumihimo braider, and a few books.

During the class, I realized that I have a lot of potential braiding materials - loads of gimp (wrapped satin cord used in upholstery), as well as skein upon skein of DMC embroidery floss. I also had a few huge spools of Japanese knitting ribbon in various shades of pink and purple. I tried braiding with the gimp, but the foam kumihimo loom was too rough on it, and the wrapping began to decay. The embroidery floss was just too fine, and didn't work will with the extremely heavy SuperLon. The ribbon faired better - in combination with the SuperLon, it created a lovely, strong and narrow braid.

I got in my order of rattail, and began braiding like crazy. I swiftly became bored with the simply one-over-one basic 8-warp braid, and tried out a few others. After a while, my interest waned. I was not successful in translating the marudai based instructions to the slotted loom, and the rattail was really beginning to bore me. I wasn't incorporating beads, and while I did enjoy the results of the braid, I soon realised that had no idea what to do with the product of my labors.

It was time to start thinking about the beads again.


___________________
*Can you tell that I'm talking about someone in particular?

Friday, October 30, 2009

The Jumeirah Silver Queen - Pearls & Kumihimo

So much for keeping this blog up to date...I really need to remember to cross post works that I publish on Beading Daily.

Just because I'm travelling doesn't mean I can't bead! My original intention when learning kumihimo in April was to have something do keep my hands busy during a trip out west. I didn't enjoy the process enough at the time to make good on my intention, but after my recent works with kumihimo and beads, I thought I'd give it another shot.

I must say that there is probably no better beading project to travel with than kumihimo. No scissors and needles, no need to worry about losing beads during turbulence. So long as you've got everything set up before departure, you'll have no problems.

I started this piece during the flight from New York to Paris


The first portion is eight strands x 20 rows of antiqued pewter beads. The main section is four strands of "cornflake" beads and side drilled potato pearls x 40 rows. I set up the strands so that the beads would stack 4 of the cornflakes and 4 of the potatoes. It finishes with another 20 rows of the antiqued pewter.

I was able to work on it sitting out on my hotel room balcony for about 3 hours, sipping ice water (that's the glass the strand is draped on) and watching the tourists take camel rides along the beach. It finally got too hot and I had to head back inside. I may finish it this evening, or leave some of it for the flight home.


At the Jumeirah Hilton, with a balcony view of the Atlantis hotel (at the apex of the outer palm island).

Cut to the post trip review:

I've finished the silver pearls kumihimo, finally. I had actually completed the braiding before leaving Dubai, but I had a lot of trouble with the second half - the last twenty rows of antiqued pewter beads. Because the strand was already so heavy, it kept dragging down the active braiding area, distorting the braided beads. I undid and rebraided it so many times (about 5) that the silk wore out and nearly broke. I packed it up and didn't work on it any further until I began recovering from my jet lag (Sunday afternoon).


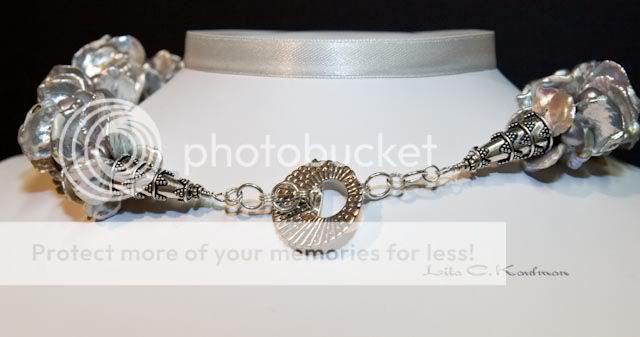
Besides the problem with the last section of metal beads, it was simply too long and too heavy, and I took drastic action. I cut the ends off on each side, pulled out the metal beads, knotted the end strands together and contemplated how to finish the project. I found a pair of longer bead cones in Hill Tribe silver, a Saki silver clasp, and some jump rings. With an hour's fierce concentration, I finished it.

It sat on my form, waiting to be photographed, when I got a brain storm. I was writing a reply to this thread, when I remembered a WiP - a beaded bezel for a pair of Art Deco crystal cabachons that I created as a proof of concept, but could never figure out what to do with. All the colors were right for a marriage between the two pieces, and with a little figuring out, I attached it to the braided pearls.

I present to you, without further delay - the Jumeirah Silver Queen!


Pendant Detail

The clasp